Difference between revisions of "Microphotography"
Jump to navigation
Jump to search

| (15 intermediate revisions by 2 users not shown) | |||
| Line 3: | Line 3: | ||
=Taking the picture= | =Taking the picture= | ||
==The keys to good pictures== | |||
*Spend time on set-up. | |||
**Clean the slide. | |||
**Look for the pristine areas without artifacts, e.g. folds. | |||
*Composition. | |||
**Put normal beside pathologic - so one has a reference point. | |||
***Transititions are usually interesting. | |||
**Where to put the centre of interest: | |||
***Truly beautiful: use the ''rule of thirds'' - see ''[[Microphotography#Composition|composition section]]''. | |||
***Functional: centre of interest in the centre. | |||
*Focus. | |||
**Sharpness of nuclear membrane and detail in the cytoplasm. | |||
*White balance. | |||
*[[De-vignetting]]. | |||
*Pictures at different magnification. | |||
**Sets are usually better than one. | |||
**Many entities have high and low power features. | |||
***It is often impossible to capture them with one picture. | |||
==Camera settings== | ==Camera settings== | ||
Exposure compensation: | Exposure compensation: | ||
| Line 21: | Line 40: | ||
Note: | Note: | ||
*Post-processing will not fix a blurry image. | *Post-processing will not fix a blurry image. The way to get sharp images is take sharp pictures! | ||
==Composition== | ==Composition== | ||
*The centre of interest | [[Image:Rivertree thirds md.gif|thumb|150px|A picture that uses the ''rule of thirds''. (WC)]] | ||
Functional pictures that tell a story and are easy to understand: | |||
*The centre of interest at the centre. | |||
An artsy look can be achieved by making use of the [[Wikipedia:Rule_of_thirds|rule of thirds]]. | |||
*Rule of thirds: centre of interest is at one of the four intersects of the imaginary lines that divide the image into thirds. | |||
=Post-processing= | =Post-processing= | ||
| Line 51: | Line 73: | ||
#Set to "background color". | #Set to "background color". | ||
== | ==Vignetting== | ||
The | Defintion: | ||
*The edge of images are darker than the centre. | |||
Microscope configuration: | |||
*[[Köhler illumination]]. | |||
*Ensure diaphragm is open. | |||
Some random notes: | |||
*Software for microscope cameras usually have de-vignetting tools. The tools go by different names and usually entail taking a background image. Ideally, one should shoot the background image at the same magnification as the (primary) image. | |||
*Vignetting is usually worse at lower magnification. | |||
Random links: | |||
*[http://www.gimp.org/release-notes/gimp-2.4.html http://www.gimp.org/release-notes/gimp-2.4.html]. | *[http://www.gimp.org/release-notes/gimp-2.4.html http://www.gimp.org/release-notes/gimp-2.4.html]. | ||
*[http://www.gimp.org/release-notes/gimp-2.4-videos.html http://www.gimp.org/release-notes/gimp-2.4-videos.html]. | *[http://www.gimp.org/release-notes/gimp-2.4-videos.html http://www.gimp.org/release-notes/gimp-2.4-videos.html]. | ||
| Line 91: | Line 122: | ||
*[http://hugin.sourceforge.net/ Hugin (sourceforge.net)]. | *[http://hugin.sourceforge.net/ Hugin (sourceforge.net)]. | ||
Image: | ===Images=== | ||
<gallery> | |||
Image:Londonpanorama.jpg | Example of stitching. (WC) | |||
Image:Enterobius - very low mag.jpg | Another example of stitching. (WC) | |||
</gallery> | |||
==Focus stacking== | ==Focus stacking== | ||
| Line 113: | Line 147: | ||
**Over-sharpening makes images look like caricatures. | **Over-sharpening makes images look like caricatures. | ||
*Sharpening should be the last step in post-processing. | *Sharpening should be the last step in post-processing. | ||
==Animation== | |||
[[Image:Squamous carcinoma - lung FNA -- high and very high mag - animation.gif|thumb|right|An animated GIF showing [[squamous carcinoma of the lung]]. (WC)]] | |||
*GIMP has a [https://www.gimp.org/tutorials/Simple_Animations/ nice tutorial (gimp.org)] on how it can be done. | |||
*Animations are particularly useful for [[cytopathology]]. | |||
=See also= | =See also= | ||
| Line 118: | Line 157: | ||
*[[Digital ISO]]. | *[[Digital ISO]]. | ||
*[[Micrographs]]. | *[[Micrographs]]. | ||
*[[Image annotation]]. | |||
*[[Micrograph wishlist]]. | |||
=References= | =References= | ||
Latest revision as of 22:00, 2 January 2016
The article deals with microphotography, i.e. creating microphotos.
Taking the picture
The keys to good pictures
- Spend time on set-up.
- Clean the slide.
- Look for the pristine areas without artifacts, e.g. folds.
- Composition.
- Put normal beside pathologic - so one has a reference point.
- Transititions are usually interesting.
- Where to put the centre of interest:
- Truly beautiful: use the rule of thirds - see composition section.
- Functional: centre of interest in the centre.
- Put normal beside pathologic - so one has a reference point.
- Focus.
- Sharpness of nuclear membrane and detail in the cytoplasm.
- White balance.
- De-vignetting.
- Pictures at different magnification.
- Sets are usually better than one.
- Many entities have high and low power features.
- It is often impossible to capture them with one picture.
Camera settings
Exposure compensation:
- None.
White balance:
- Normal.
Focusing
Setting live view:
- Rench (II).
- Live view function settings.
- Live View shoot.
- Live view function settings.
- Press "Set" button to open the shutter.
Use the zoom button (on the camera): press twice to digitally magnify 10x.
- Focus microscope as usual (@ 10x digital magnification).
Note:
- Post-processing will not fix a blurry image. The way to get sharp images is take sharp pictures!
Composition
Functional pictures that tell a story and are easy to understand:
- The centre of interest at the centre.
An artsy look can be achieved by making use of the rule of thirds.
- Rule of thirds: centre of interest is at one of the four intersects of the imaginary lines that divide the image into thirds.
Post-processing
GIMP scripts:
- White-balance.
- Shadows & highlight.
White balance
- May be done with:
- White balance plugin.[1]
- Curves function (in GIMP).
Curves function (in GIMP)
- Adjust magnitude, then blue, then green -- red should be last.
- Low magnification images tend toward "too pink" with the white-balance script.
White balance plugin (script)
Procedure:
- Select
- Filters.
- Colors.
- White balance.
- Colors.
- Filters.
- Use eye dropper to select what should be white on the image.
- Set to "background color".
Vignetting
Defintion:
- The edge of images are darker than the centre.
Microscope configuration:
- Köhler illumination.
- Ensure diaphragm is open.
Some random notes:
- Software for microscope cameras usually have de-vignetting tools. The tools go by different names and usually entail taking a background image. Ideally, one should shoot the background image at the same magnification as the (primary) image.
- Vignetting is usually worse at lower magnification.
Random links:
- http://www.gimp.org/release-notes/gimp-2.4.html.
- http://www.gimp.org/release-notes/gimp-2.4-videos.html.
De-vignetting
Student method
- Take picture as one wants.
- Remove slide and shoot the background.
In GIMP:
- Load image.
- Load background as a layer ("Open as layer... ").
- Make background into an "overlay" in Layers dialog box.
- Invert background.
- Save as jpg (merge with background).
Adapted from codeforhire.com
Procedure:[2]
- Load image in GIMP.
- Duplicate layer (right click on layer and select Duplicate Layer).
- Apply Gaussian blur to top layer.
- Filters -> Blur -> Gaussian Blur
- Select a blur radius 1/5 of the smallest dimension of the image.
- If the image is 2768x2110, the blur radius should be 2110/5=422.
- Select a blur radius 1/5 of the smallest dimension of the image.
- Filters -> Blur -> Gaussian Blur
- Invert top layer (Colors - Invert).
- Change top layer to Overlay mode.
- Normal top (masking) layer (Colors - Auto - Normalize).
- Adjust brightness of (top) layer (Colors - Brightness-Contrast).
- Merge layers.
- Right click on top layer and select Merge Down.
Stitching
- A technique to increase the field of view.
Software:
Images
Focus stacking
- A technique to increase the depth of field.
Software:
Image:
Dirt and defects
- It is best to clean the slide.
- Photons are free... time is not.
- Dirt and defects can be removed with the clone tool in GIMP.
Sharpening
- Images should be sharpened to enhance edges.
- This is particularly important if the image is projected on a large screen and/or enlarged.
- Over-sharpening makes images look like caricatures.
- Sharpening should be the last step in post-processing.
Animation

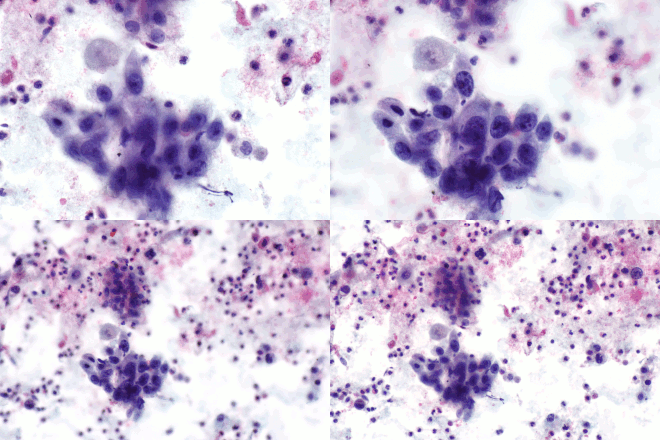
An animated GIF showing squamous carcinoma of the lung. (WC)
- GIMP has a nice tutorial (gimp.org) on how it can be done.
- Animations are particularly useful for cytopathology.
See also
References
- ↑ URL: http://registry.gimp.org/node/72. Accessed on: 26 July 2010.
- ↑ URL: http://codeforhire.com/2013/06/29/simple-image-devignetting/. Accessed on: October 16, 2014.


